Projector Blog : Installing a projector on a budget
Where to Start.
The very best way to save a bit of money on your home theatre is to spend some time planning and do do as much of the work as possible yourself. When I purchased my first home theatre projector I decided to save on the installation and simply placed the projector on a small table at the back of the room between my couches. I also projected onto my wall instead of purchasing a screen. This is a great option for some but increases the risk of the projector getting knocked, and you may not like the fan noise if sitting right next to the unit.... image quality is also never as good on a wall as it is when using a good quality projector screen.
After moving to my new home I decided to install the projector on the ceiling. Having a trade do the full installation and set up was going to cost me several hundred dollars more that I really preferred to keep after my expensive move. Obviously the more work an installer needs to do the more expensive the final bill so I did some planning and tried to do as much work as I could.
My new home did not have any power on the ceiling so I was always going to need an electrician to come and at least put a power point in for me. Electrical work like this should always be done by a licensed electrician, it is not worth the risk in cutting costs here and trying to do electrical work yourself. After I selected by screen size and calculated the throw distance I put a mark in the ceiling where I neeeded the projector to be. I got a quote from a local electrician and for a little over $200 the power point was installed in the roof directly behind where I was going to place the projector. If you are happy spending a bit more, most electricians can also run your HDMI cabling and install the projector too.
My Equipment- Epson EH-TW8300 Projector
- Epson Ceiling mount
- 10M HDMI Cable
- 2x 2M HDMI Cables
- HDMI Wall Plate
- 112" Grandview Fixed 4K screen
- Denon Receiver
- Polk 5.1 Speaker system
DIY
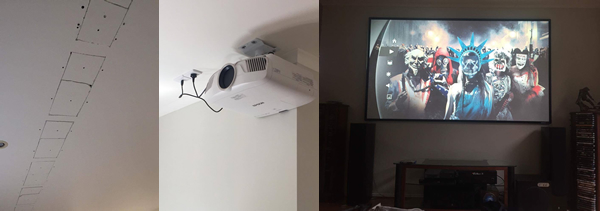
My new home is 2 stories, as I am attaching my projector to the ceiling of the lower level it doesn't leave much cavity space for the HDMI cable to be installed. In order to install the power the electrician had already had to cut out sections of my plasterboard ceiling, I ended up cutting a bit more out to put through the HDMI cable. I tried to keep the cuts as neat as possible so I can still use the cut out pieces later to plug the holes.
Installing the HDMI cable was a bit of work as I needed to thread it down the wall to a cut out I had made behind where the Receiver is going to be. Once done I did some "YouTubing" to work out how to repair the plaster holes in the ceiling using the cut outs I kept and loads of putty. Once dried and sanded I gave it a quick paint and done!
Installing the ceiling mount was straight forward. I made sure to place the projector right under a ceiling truss beam so a couple of timber screws into that and the mount was up. Following the instructions that came with the projector, and with the help of my partner, I had the projector up on the ceiling in less than 15minutes.
The screen was simple to install but once assembled it was pretty big so definately get someone to help you out. A spirit level is a must, the last thing you want to do is install your screen on an angle. I used a combination of timber screws and plaster anchors to install... depending on where I needed to put in the screws and if there was a support behind the plaster wall. Once up on the wall I turned on the projector, displayed the 'test pattern' and adjusted the focus, zoom, and lens shift functions to get the image correctly within the screen and looking amazing. For the time being I've got my speakers on stands with the speaker cables running on the ground up against the wall. Eventually I'll have them installed on the wall to finish it all off. Many electricians, handyman services, and AV installers like Jims Antennas can install the speakers without too my trouble if you don't want to do it yourself.